Check it out:

Followers

Check Out My Products on TPT!

 photo 08cdd46e.jpg

Follow Me on Pinterest!

 photo 437c1878.jpg
Showing posts with label Organization. Show all posts

Saturday, August 9, 2014

Part 4: Organizing my Classroom Library

So here is the beginning of my classroom tour. The only part of my classroom that is completed is my library. I will break down how I organize my classroom library for you.


How did you acquire so many books?
This is an important question because as we know, teachers don't make enough money to just go to Barnes and Noble and buy every book we want. I have received my books from multiple sources.

The first place I bought many of my books was from www.Scholastic.com. At scholastic, you can put out your monthly flyer and buy books for yourself, as well as parents can buy books. For every book purchased, you will earn bonus points. These bonus points can be used to buy books, cds, technology and a variety of teaching supplies and furniture.

The other place I bought most of my books for SUPER cheap was through book sales. Libraries across the country hold book sales once or twice a year to get rid of books that have been donated to them that they don't need. Many of these books are in just slightly used condition and there are a lot of great, high quality books. At my book sales in NH, the children's books are usually only 25 cents. You can find book sales in your area by going to www.booksalefinder.com.

The final place that I received some of my books was from a teacher that retired prior to me moving into her room. I recommend that you pay attention to anyone you might know that are retiring. Most teachers that are retiring do not take all of their books with them and they might be willing to give some to you.

How do you sort your books?
I sort my books through a variety of levels and subjects. Some of my books are sorted by author, such as: Dr. Seuss, Robert Munsch, Leo Lionni, Eric Carle, etc. Some of my books are sorted by title, such as: Magic School Bus, Clifford, Curious George, etc. I have many books sorted by theme, non-fiction and guided reading levels. To determine a books guided reading level, I used two different websites/apps. Book Wizard by Scholastic is very effective and just requires you to type in the title. You can find Book Wizard here: www.scholastic.com/bookwizard/ . I also used the app, "Level it." Level it allows you to just scan the barcode on the back of the book or manually type in the title. This app is still working on adding many titles, so there are some titles that cannot be found when you scan for them.

Where did you get your labels?
You can buy my labels in either zebra print (shown in my classroom) or in blue chevron print. Sadly, they will not be able to include the books by author or title because it is considered copyright infringement. However,  there will be blank labels for you to write them in. The next 5 people to follow my blog or leave a comment on my blog will receive their choice of my chevron or zebra library labels for free!

My zebra labels can be found here: http://www.teacherspayteachers.com/Product/Library-Book-Bin-Label-Zebra-Print-1389433

My blue chevron labels can be found here: http://www.teacherspayteachers.com/Product/Library-Book-Bin-Label-Blue-Chevron-1389328

Where did you buy your bins?
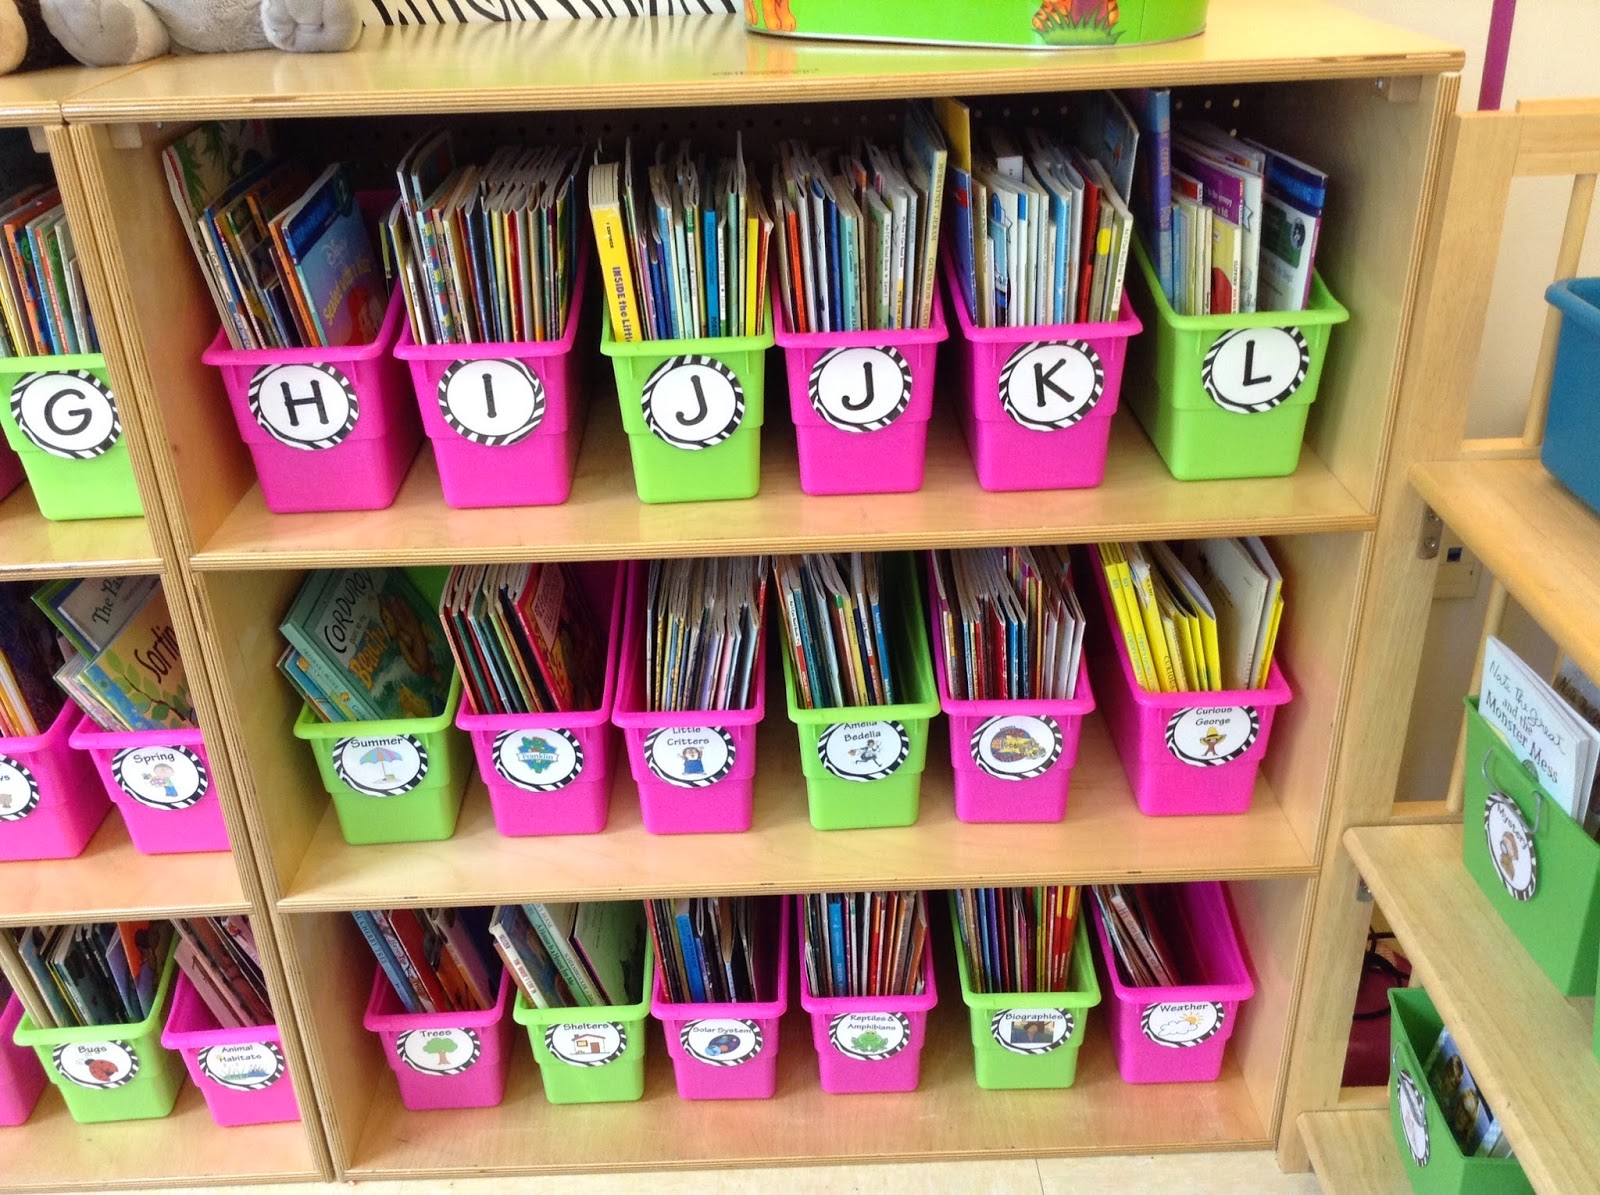
 These green and pink bins are from ReallyGoodStuff. You can find them in a variety of colors here:
http://www.reallygoodstuff.com/durable-book-and-binder-holders/p/160103/

Also, these bins are 20% off this weekend!

The top bins are from Lakeshore Learning, but I spray painted them turquoise. You can see my post about spray painting them here:
http://coordinatedclassroom.blogspot.com/2014/07/spray-paint-galore.html

The green bins are from the Dollar Tree. They are the perfect size for chapter books!

The pink bin with my reading buddies is from Walmart by Sterilite. The turquoise bin is from Target by Sterilite. The pink lap desk is from Michael's and will be used for our library center during learning stations. The white bins are from Walmart, also by Sterilite.

Any other questions? Post them here and I'll be happy to answer! :)

Enjoy  the sunshine,
Jessica

Wednesday, July 16, 2014

Summer Pinterest Projects


Hi All,

I hope you're finding time this summer to relax and enjoy family time. I've been using these rainy days we are having in NH to work on some of my classroom projects. As I complete projects I will post them here so you can see them. 

Here's what I have so far...

This is my favorite project thus far...my own teacher toolbox. I've been eyeing this project for the past couple years, but in my previous school I had a ton of cabinet and drawer space. I am now going to a school that has barely any, so it was time to start this wonderful project!
You can find this container from Home Depot or Amazon. The prices are pretty similar between both places. You can find my labels here: http://www.teacherspayteachers.com/Product/Teacher-Toolbox-Labels-Zebra-Theme-1259869 FREEBIE ALERT...The first five people to follow me and post a comment on this post about their favorite back to school pinterest project will receive my teacher toolbox labels for free!

To create this project, I just printed out my labels, laminated them and then taped them into the insides of the drawers. You could also skip the laminating and mod podge them on.

I am in love with my no name clothespin board.
To create this board you will need:
9x12 piece of plywood
Acrylic Paint
Clothespins 
Duct Tape (I bought my zebra tape from Michael's.
Ribbon (1 spool)
Cricut to cut letters or precut letters
Mod Podge
Hot Glue Gun

First I took the plywood and painted 2 coats of acrylic paint on.
Next I used my zebra duct tape to border the edges of the plywood. I did this so I wouldn't have to sand my plywood, however this is not necessary if you choose to sand your edges.
Then I used my Cricut and Don Juan font cartridge to cut out the letters and glued them on.
To seal everything I put on 2 coats of matte Mod Podge. 
Then I used acrylic paint to paint my clothespins.
Finally I used my hot glue gun to add on the ribbon and clothespins.


A great way to organize your papers is to use this 3 Drawer Paper Sorter.
To create this project you will need:
3 Drawer Sterilite Unit
Scrapbook Paper
Mod Podge
Cricut to cut your letters or precut letters

First I used my Cricut and cutting edge font cartridge  to make my letters. 

I plan to use the first drawer for all of my papers that I need to grade. I grade one night a week, so everything sits in there for me. The second drawer is used for me to put all of my papers that I need to file in either student files or in my master copy files. The third drawer is for my emergency sub plans. I live an hour away from my school, so I always keep a couple of sets of emergency plans so my coworker can just go to that drawer and pull it out if I need them and I don't have to go into work.

Next I glued my letters onto the paper and mod Podged both sides of the paper to make sure it is attached well. Let it dry and you're done!

I hope you're enjoying my projects! Check back for my next project!
Jessica :)

Thursday, July 3, 2014

How to Design an Organized and Functional Classroom {Part 3}

I am very excited about the summer projects I have planned to get my new classroom into tip-top-shape. Ryan, my supportive and oh-so patient boyfriend, laughs at me that it's my summer break and as soon as some rain comes in (which has been in plenty in New England the past couple of days) I am Pinteresting away. So here are the pictures and links to the summer projects I have planned. When I complete my version of the project I will post it below the pin. What Pinterest projects are you planning on doing this summer?

http://whathappensinfirstgrade.blogspot.com/2012/09/fun-friday-on-sunday-night-and-freebie.html
I love the idea of encouraging positive behavior in the hallways. This is always a challenge for firsties. I hope this works! :)

I couldn't find the link on this one, so whoever's original idea this was...GENIOUS! In years past, my team and I have shared construction paper, so it was stored in stacks in our storage closet. This year, I have my own supply in my classroom and this is a great solution!
Love this idea! What a great way to make students take responsibility of their work.
This will save my desk from the unorganized pile of notes and drawings that end up cluttering my work space every day!
This is a great way to keep book repairs from interrupting valuable teaching time. Stick the book in the book hospital and then I can repair it when I have free time...Like that happens all the time. ;)
I've actually already made my teacher toolkit, but I haven't gotten the chance to upload my picture yet. I'm so in love with this project!
I've done this project before (check out my old post of Made it Monday) and I love my 2 rolling carts. Now, I think I'm going to take on the challenge of dressing up this large clear 3 drawer storage cart. It's filthy and ugly...I think this and some soap will be the answer. :)
I love covering the front of the desk. I think I'm going to add pictures of our class throughout the year so that we can have a wall of memories to look at.
What a great way to store plastic bags for students who forget their backpack! I think my version will add some zebra print duck tape to cover the label up.
 
I can't wait to get started on these projects.
 
What's on your project list?
xo Jessica

How to Design an Organized and Functional Classroom {Part 1}

It is the beginning of July, and if you're like me, you're trying to hold onto every minute of summer vacation, however thoughts of your classroom just keep sneaking into your mind. Well normally I don't start thinking about my classroom until the end of July because I couldn't get into my classroom until mid-August. However this year I moved to a new district-new school-new classroom.

All of my friends joke with me about how much time I put into my classroom set up in the summertime, but I PROMISE you, it's so worth it. If you're the type to say, "I'll get to it later." You all know that later never comes. Once the kids start, there are too many other things to do like lesson plan, make family contact calls and sleep. So don't delay, ORGANIZE! It's so worth it. If your school allows it, I suggest getting in on rainy days when you're not missing any summer sunshine. :)
 
It's amazing how a new classroom brings back all the memories of trying to remember how you've always got your past classrooms to that feeling of the perfect set up. So I decided to break down my classroom set up for all of you as I do it.

The first part of making sure you set up a functional and organized classroom is to make a plan. I always plan out what areas I need to make sure I have for my classroom. Depending on your curriculum, class size, and room, everyone's list might vary.

Here's my MUST have list:
  • Whole Group Carpet Area
  • Small Intervention Group Area with Kidney Table
  • Student Work Spaces (I have trapezoid shaped tables, which I set up in hexagons)
  • Math Manipulatives
  • Art Supplies (Not for daily student access)
  • Daily Art Supplies (For easy student access)
  • Student's Every Day Supplies (Pencil, folder, etc)
  • Teacher Desk (No, I'm not at the point where I'm willing to part with mine yet.)
  • My Daily Plans/Supplies
  • Teacher Storage (Office Supplies, Text Books, etc)
  • Homework/Finished Work Paper Area
  • Literacy Center Materials
  • Teacher Technology Area (document camera, laptop)
  • Student Technology Area (iPods and iPads)
  • Cleaning Supplies (Lysol Wipes, Baby Wipes, Extra Paper Products)
  • Classroom Library (Book Storage and Student Sitting Area)
  • Book Storage for Teacher Read Aloud/Mentor Texts
  • Take-a-Break Space or Regrouping Space for Behavior Management
That's my own list, but what about you guys? What are on your must have spaces on your classroom set up list?

Follow me so you don't miss the future parts to this series...
Part 2: Before Pictures
Part 3: Planned Pinterest Summer Projects for the Classroom
Part 4: Organizing My Classroom Library
Part 5: Teacher Desk/Space Organization
Part 6: Organizing Manipulatives/Supplies
Part 7: Photo Tour of my new 2014-2015 Classroom!

Also check back for miscellaneous posts on my experiences making some favorite teacher Pinterest projects and freebies!

Enjoy this 4th of July Weekend!
xo Jessica